Aurora Photography Settings: What Actually Works (No Pro Gear)
We have photographed the northern lights dozens of times from our backyard in Rovaniemi. Here are the exact settings we use — whether you have a DSLR, mirrorless, or a mid-range smartphone.

We’ve planned more than a hundred trips from our home in Finnish Lapland — some for clients, some for weekend road trips across Norway, and more recently a lot of them chasing the aurora across Finnish Lapland. After years of winter chasing a year, we want to share what actually works, what breaks, and the exact prompts we use.
This is not a “10 ways AI will change travel” think-piece. It’s the workflow we use ourselves.
For most cameras: ISO 1600-3200, aperture f/2.8 (or as wide as your lens allows), shutter speed 4-8 seconds. Manual focus to infinity, use a tripod, shoot RAW. Smartphones need a night-sky or pro mode — and yes, they can produce surprisingly strong results in Lapland.
- Why aurora photography is harder than it looks
- The gear you actually need (and what you can skip)
- Core camera settings explained
- Focusing in the dark: the trick that changed everything
- Smartphone aurora photography: settings that work
- Reading the conditions: when to shoot
- FAQ: aurora photography questions we always get asked
Why aurora photography is harder than it looks
The northern lights look magical to the naked eye. But point a camera at them for the first time and you will probably get a blurry, grey smear — or nothing at all. This is not your fault, and it is not your gear. It is just that aurora photography has a few specific requirements that nobody explains clearly.
The core problem is light and movement. Aurora borealis is dim compared to what cameras expect at night, and it moves. A shutter speed that is too slow will turn a dancing green curtain into a washed-out blob. A shutter speed that is too fast will not collect enough light. Finding the right balance is the whole game.
We shot our first aurora in 2019 with a basic Canon DSLR we borrowed from a friend. The images were terrible. Over the next few winters, shooting from our home in Rovaniemi, we slowly figured out what actually works. This guide is the shortcut we wish we had.
One important clarification before we go further: aurora photography settings depend heavily on aurora intensity. A KP-5 storm will look completely different from a faint KP-1 glow, and your settings need to adapt. We will cover that in section six. For now, we are starting with the baseline settings that work for a typical active display.
The gear you actually need (and what you can skip)
You do not need expensive gear to photograph the aurora. You do need a few things, and there is no substitute for them.
The single most important item is a tripod. Any tripod. A cheap travel tripod from Amazon is fine. The camera must be completely still during a multi-second exposure, and hand-holding is physically impossible. If you only buy one thing for your aurora trip, buy a tripod.
A fast wide-angle lens matters more than the camera body. The ideal is something like a 14mm to 24mm lens with a maximum aperture of f/2.8 or wider. If you have a kit zoom lens that only opens to f/4 or f/5.6, you can still shoot aurora but you will need to push your ISO higher, which means more noise. A fast 50mm lens also works — you just get a narrower frame.
Camera bodies: any modern mirrorless or DSLR from the last eight years will handle aurora fine. Sony A7 series, Nikon Z-series, Canon R-series, older Canon 6D or Nikon D750 — all excellent. The sensor quality in recent mid-range cameras is honestly impressive. We have been using a Sony A7III and are very happy with it, but we got great results on a Canon 80D before that.
What you can skip: expensive filters (remove them at night), remote shutter releases (use the 2-second self-timer instead), star trackers (too complex for casual aurora shooting), and external light meters (your histogram is your meter).
Core camera settings explained
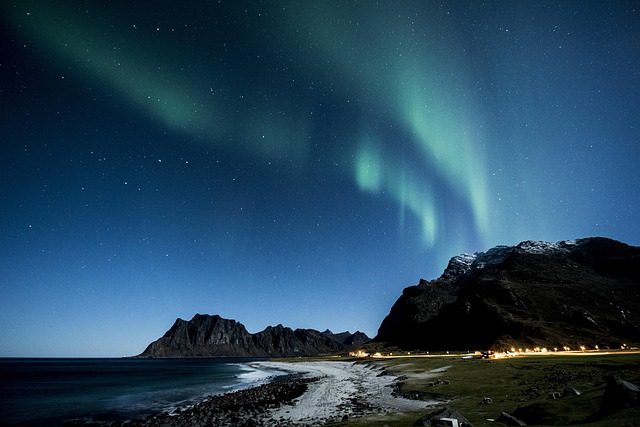
Here are the baseline settings we start with for a typical active aurora display. We will explain why each one is set this way.
Mode: Manual (M). Aurora changes brightness and speed too fast for any automatic mode to keep up. Take control.
Aperture: f/2.8 or as wide as your lens opens. This is not negotiable. You need every photon you can collect. If your lens only opens to f/4, use it — just compensate with higher ISO.
Shutter speed: 4-8 seconds. Start at 6 seconds for an active display. If the aurora is moving quickly (bright, fast-dancing curtains), go shorter — 3-4 seconds — to freeze the movement. If it is a slow, faint glow, go up to 10-15 seconds. The 500 rule (divide 500 by your focal length) works for stars but causes aurora blur; ignore it here.
ISO: 1600-3200. Start at ISO 1600 and review your histogram. If the image is too dark, go to 3200. Modern cameras handle ISO 3200 very cleanly. We sometimes push to ISO 6400 on faint nights, accepting a little more noise in exchange for a brighter image.
White balance: 3800-4500K (manual). Auto white balance will try to neutralise the green. Set it manually. We use 4000K as our starting point, which gives a slightly cool, natural Arctic feel.
File format: RAW. Always. A RAW file retains all the data the sensor captured, and aurora images almost always need some post-processing. Exposure, colour temperature, noise reduction — RAW gives you full control. JPEGs are fine for snapshots; aurora photography is not a snapshot situation.
Image stabilisation: OFF. When the camera is on a tripod, IS/IBIS can actually introduce micro-shake. Turn it off.
Focusing in the dark: the trick that changed everything
Autofocus does not work in the dark. The camera hunts, fails to lock, and you end up with a soft image. Every aurora photographer learns this the hard way.
The solution is manual focus set to infinity — but not quite as far as the infinity mark on your lens. Most lenses overshoot slightly when focused all the way to the infinity hard stop. You need to back off just a hair.
Here is our method. In the afternoon, before it gets dark, point your lens at a distant object (a rooftop, a treeline, anything more than 50 metres away) and let autofocus lock on. Then switch the lens to MF and do not touch the focus ring. Put a small piece of masking tape over the focus ring so it cannot accidentally move in the cold. That is your aurora focus setting for the rest of the night.
Alternatively, use Live View at maximum zoom on a bright star, and manually focus until the star is a sharp pinpoint rather than a fuzzy blob. This takes about thirty seconds once you get the hang of it.
One practical Rovaniemi tip: bring spare batteries and keep one in an inner pocket close to your body. Cold drains lithium batteries extremely fast. At minus twenty, a battery that shows half-full in a warm apartment might last only forty minutes outside. We always carry three batteries per camera on a serious night out.
Smartphone aurora photography: settings that work
Smartphone aurora photography has genuinely improved in the last two years. Google Pixel and iPhone 15 Pro series can produce usable aurora shots with the right settings. Older or mid-range phones can also work, but require a third-party app.
On an iPhone, use the native Camera app and select Night mode. Set the exposure time manually to the longest available (up to 10 seconds on a tripod). The computational processing Apple applies is actually very good at reducing noise. On a Pixel, Astrophotography mode (part of Night Sight) does something similar and works remarkably well.
For other Android phones, we recommend the app NightCap or ProShot. Set ISO between 800-1600, shutter 6-10 seconds, and stabilise the phone on a tripod with a small phone mount (very inexpensive and worth having). Manual focus to infinity in the app.
The key limitation of smartphones is lens speed. Most phone cameras open to around f/1.8 on the main lens, which is actually quite fast — competitive with many dedicated camera lenses. The weakness is sensor size and noise performance at high ISO. But for social media sharing and travel memories, modern smartphones can absolutely deliver.
One thing that does not work: video mode. Aurora moves slowly enough that the live view on your phone may look incredible, but standard video (30fps, short shutter) captures almost nothing. Use stills.
Reading the conditions: when to shoot
Great aurora photography is ninety percent timing and ten percent technique. You can have perfect settings and a fast lens, but if you are outside on the wrong night, you will photograph nothing.
The single most useful tool is the Space Weather app or the SpaceWeatherLive website. Check the KP index forecast. KP3 and above is worth going outside for in Rovaniemi; KP5 is a major storm that will light up the whole sky. We also watch the Bz component of the solar wind — when it goes consistently negative (southward), aurora activity picks up within an hour or two.
Cloud cover is equally important. A KP7 storm means nothing if thick cloud is sitting over Lapland. We use Yr.no (Norwegian meteorological service, excellent for Arctic Finland) and Windy.com for cloud forecasts. On cloudy nights, sometimes it is worth driving 40-80 km east or west to find a clear sky corridor — we have done this more times than we can count.
The best light conditions for photography are a clear, moonless night with moderate aurora activity (KP3-4). A full moon actually lights up the snow landscape beautifully and gives your shots a foreground, but it also washes out fainter aurora. Our favourite shots have been shot in the blue-black darkness of a new moon week.
Timing during the night: aurora can appear any time after dark, but statistically the most active window in Rovaniemi is between 10pm and 2am local time. We set an alarm for midnight, check the app, and go out when it looks promising. Patience is the unglamorous secret of every aurora photographer.
FAQ: aurora photography questions we always get asked
What ISO should I use for northern lights photography?
Start at ISO 1600 for an active display and go up to ISO 3200 if the image looks too dark. On faint nights we sometimes use ISO 6400. Modern camera sensors handle these values cleanly. Always check your histogram rather than the preview — the LCD looks brighter than the actual exposure.
Can I photograph the aurora with my phone?
Yes, especially with newer iPhones (Night mode) or Google Pixel (Astrophotography mode). Older or mid-range Android phones work best with a manual camera app like NightCap or ProShot. Set ISO 800-1600, shutter 6-10 seconds, and put the phone on a tripod. Results have improved dramatically in the last two years.
Why are my aurora photos blurry?
The three most common causes: no tripod (or an unstable one), autofocus hunting in the dark (switch to manual focus set to infinity), and image stabilisation left on while on a tripod (turn it off). Also check that your shutter speed is appropriate for the speed of aurora movement — fast curtains need 3-4 seconds, not 10-15.
What is the best focal length for aurora photography?
Wide-angle lenses between 14mm and 24mm (full-frame equivalent) give you the most sky and the most dramatic foreground context. A 14mm or 16mm is ideal. A 50mm works but gives a much tighter frame. Avoid telephoto lenses — they require very short shutter speeds to avoid star trails, which is too short for aurora.
Do I need a special app to photograph the aurora?
Not for the photography itself — any camera app with manual controls works. But you absolutely need a space weather app for forecasting. We use Space Weather by SpaceWeather.com and SpaceWeatherLive. For cloud forecasting in Lapland specifically, Yr.no is more accurate than most international apps.
What time of night is best for aurora photography in Rovaniemi?
Statistically the most active window is 10pm to 2am local time. Aurora can appear anytime after dark (which starts around 3pm in December), but the late-night hours see more consistent geomagnetic activity. Check the KP forecast before you set your alarm — a predicted KP3 or above is worth staying up for.